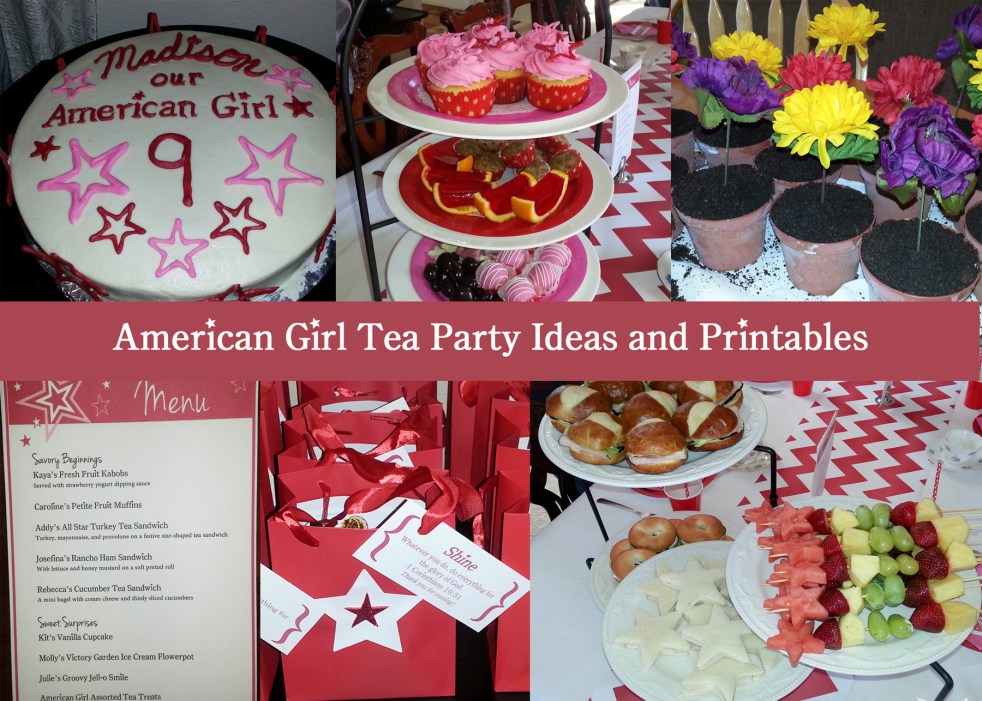
After begging for an American Girl doll the past three years, my daughter’s greatest desire was granted her last birthday with the gift of a green-eyed, curly blonde haired mini-me. She promptly named her doll “Maddie” and they’ve been inseparable ever since. The gratification of at last owning an American Girl doll all of her own could only be topped by celebrating her birthday this year with a themed American Girl tea party extravaganza. She wanted all her friends to come over and play dolls with her, while enjoying a delightful (and very grown up) tea. So here’s my great big American Girl Tea Party Birthday post, complete with free printable invitations, menus, name tags and all the food and craft ideas you could hope for!
Pumpkin Spice Deathcakes (Pumpkin Spice Cupcakes with Cream Cheese Frosting)
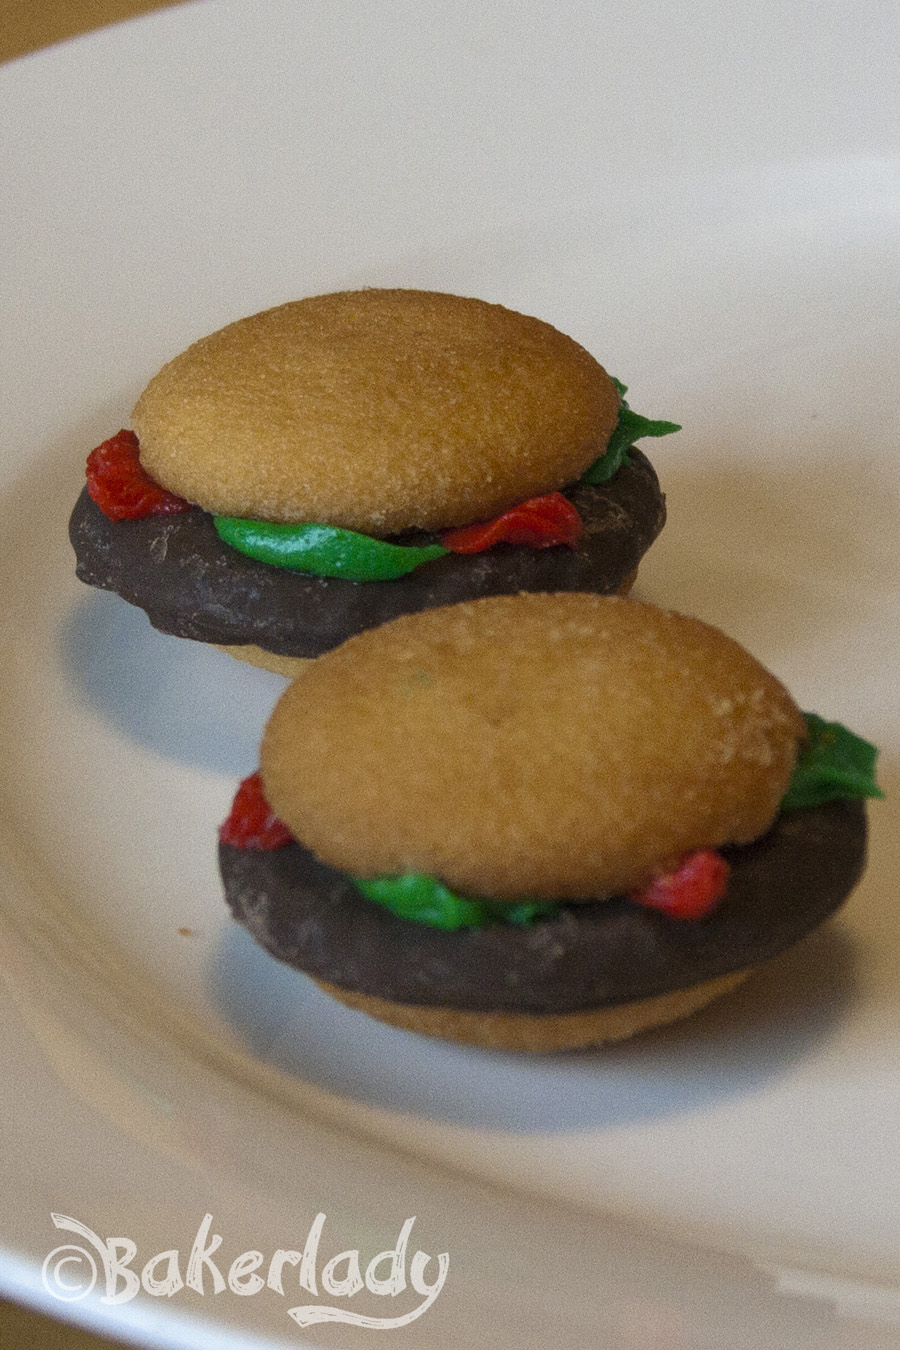
Spice cupcakes have been a Halloween tradition for me since childhood. These “deathcakes” are full of cinnamon and pumpkin topped with a glorious cream cheese frosting. Delicious.
Love this recipe idea? Check out more Halloween party food on my Fabulously Freaky Halloween Fodder post. It’s full of devilish and delicious ideas!
Print Recipe for Pumpkin Spice Deathcakes
Pumpkin Spice Deathcakes
from Cake Central
1 box spice cake mix
1 cup all-purpose flour
1 cup granulated sugar
½ tsp salt
3 eggs
1 cup water
1 cup sour cream
1 cup canned pumpkin
2 tsp vanilla extract
Directions
Whisk together dry ingredients then add wet and beat on low speed for 2 minutes.
Bake at 325 for 20-25 minutes. Makes about 36 cupcakes.
Cream Cheese Frosting
1/2 cup of shortening
1/2 cup (one stick) unsalted butter @ room temp
1 8oz bar cream cheese @ room temp
1 T vanilla extract
2 lbs shifted powder sugar
1/2 tsp salt
Directions
Cream together shortening, butter, and cream cheese until nice and smooth. Add vanilla into mixture and combine. Sift together sugar and salt, and slowly add to shortening, butter & cheese mixture. Make sure that all sugar is incorporated.
Crusting Buttercream & The Great Cupcake Pan
This week I had the tremendous privilege of making the topper for a wedding tower. The bride and groom wanted a giant cupcake, so that’s what they got. I tested out several buttercream recipes and absolutely loved this one. It tastes delicious and crusts up beautifully but is still soft enough to cut thru.
Strawberry Dream Cake
I can honestly tell you that this recipe was a present for me. From God. No joke. Let me explain. Some lovely people I know just got married. A few days before the wedding I agreed to help out by making a giant cupcake for them to cut into for the smash-cake-in-your-face moment at the wedding. The bride wanted a strawberry cake, but every single recipe I could find used strawberry flavored Jello in it. I’m sure the Jello cakes would have been fine, but the color just seemed too fakey pink given that the bottom of the cake wasn’t going to be frosted.
I searched for several hours and couldn’t find anything that looked good enough for me to use. Frustrated, I went to bed. The next morning in my Twitter feed was a post from America’s Test Kitchen that said “Yes, strawberry cake without Jello is possible with our Strawberry Dream Cake”. (pick my jaw up off the floor) Are you kidding me? I made the recipe that day as a test. It was very good, but a little denser than I wanted. I decided I could make life a lot easier on myself by bumping up the strawberry portion and using a white boxed cake mix as the base. The result was a light deliciously strawberry cake that took only a little more effort than a basic boxed mix. I’ve included both recipes for you. The resulting color is very pale pink and lovely. Since I was taking this to a wedding, you only get photos of the outside.
The cake mix variety I turned into cupcakes to taste test before the wedding and thought I’d share a very important tip with you. Do not frost cupcakes when they are still warm. Do. Not. Do. Not! It does not matter how good you are at frosting techniques, you will fail if the cupcakes are even a little bit still warm. Blame it on the delicious smell, I couldn’t wait. I wanted to try them! I used a new crusting buttercream frosting, added the pressed out strawberry solids from the cake instead of the water called for & adjusted with powdered sugar to get the right consistency. It tasted like strawberry ice cream. Delicious. You can just add the pressed strawberry solids to your favorite buttercream (or cream cheese) frosting. Pat them dry first though, moisture and frosting don’t go well together. Warm cupcakes and frosting don’t go together either. See?
Strawberry Dream Cake
a Bakerlady Original
1 box of white (or vanilla, french vanilla) cake mix
3 cups frozen whole strawberries
eggs & oil called for on back of boxed mix
1/2 cup of whole milk
1. Transfer strawberries to bowl, cover, and microwave until strawberries are soft and have released their juice, about 5 minutes. Place in fine-mesh strainer set over small saucepan. Firmly press fruit dry (juice should measure at least 1 cup); reserve strawberry solids. Bring juice to boil over medium-high heat and cook, stirring occasionally, until syrupy and reduced to 1/2 cup, 6 to 8 minutes. Whisk milk into juice until combined.
2. Prepare cake mix as directed on box. Substitute milk and strawberry mixture for water called for. The boxed mix I used called for 1 cup of water. So I used 1/2 cup strawberry puree and 1/2 cup of milk. Adjust these amounts based on your box mix directions. Bake according to box directions and size of pan you’re using.
3. Top with your favorite buttercream (or cream cheese) frosting – add the reserved strawberry solids after patting them dry for an extra burst of strawberry.
Strawberry Dream Cake
from America’s Test Kitchen
- 10 ounces frozen whole strawberries (2 cups)
- 3/4 cup whole milk, room temperature
- 6 large egg whites, room temperature
- 2 teaspoons vanilla extract
- 2 1/4 cups (9 ounces) cake flour
- 1 3/4 cups (12 1/4 ounces) granulated sugar
- 4 teaspoons baking powder
- 1 teaspoon salt
- 12 tablespoons unsalted butter, cut into 12 pieces and softened
Instructions
1. For the cake: Adjust oven rack to middle position and heat oven to 350 degrees. Grease two 9-inch round cake pans, line bottoms with parchment, grease parchment, and flour.
2. Transfer strawberries to bowl, cover, and microwave until strawberries are soft and have released their juice, about 5 minutes. Place in fine-mesh strainer set over small saucepan. Firmly press fruit dry (juice should measure at least 3/4 cup); reserve strawberry solids. Bring juice to boil over medium-high heat and cook, stirring occasionally, until syrupy and reduced to 1/4 cup, 6 to 8 minutes. Whisk milk into juice until combined.
3. Whisk strawberry milk, egg whites, and vanilla in bowl. Using stand mixer fitted with paddle, mix flour, sugar, baking powder, and salt on low speed until combined. Add butter, 1 piece at a time, and mix until only pea-size pieces remain, about 1 minute. Add half of milk mixture, increase speed to medium-high, and beat until light and fluffy, about 1 minute. Reduce speed to medium-low, add remaining milk mixture, and beat until incorporated, about 30 seconds. Give batter final stir by hand.
4. Scrape equal amounts of batter into prepared pans and bake until toothpick inserted in center comes out clean, 20 to 25 minutes, rotating pans halfway through baking. Cool cakes in pans on wire rack for 10 minutes. Remove cakes from pans, discarding parchment, and cool completely, about 2 hours. (Cooled cakes can be wrapped with plastic wrap and stored at room temperature for up to 2 days.)
“Bethany” Chocolate Salted Caramel Cupcakes
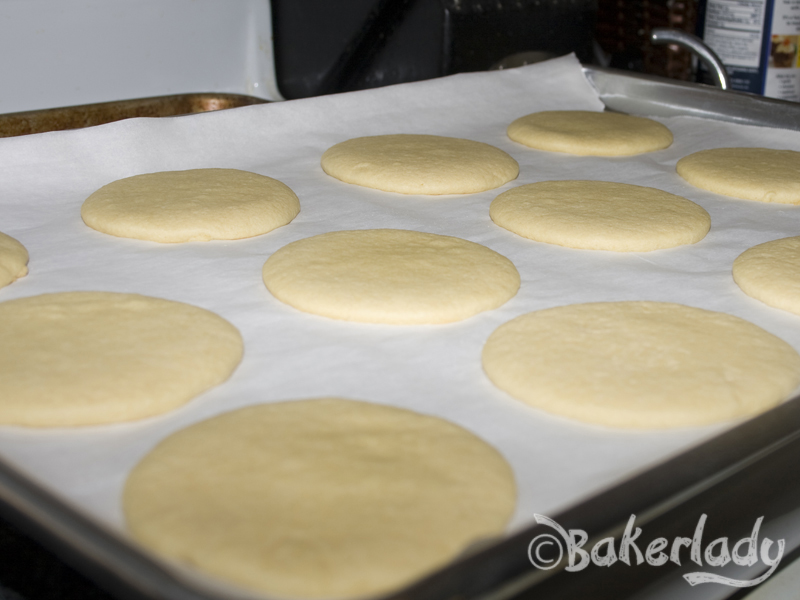
For those of you who don’t know, occasionally I make a recipe that’s specifically for a very special person in my life. I name the recipe after them and someday when I have my own little shop, I plan to feature all my ode to friendship items. I’ll be surrounded by the baked versions of all the people I love. It will be awesome! Today’s friend is Bethany. More about her later.
These cupcakes are the best thing I’ve ever made. They are glorious. Incredible. You will need to close your eyes and breathe deeply upon first bite. They are a taste explosion. The reason I made this delicious treat is kind of a bummer. My best friend Bethany moved to Maui today. I dropped her at the airport this morning and we both bawled our eyes out. Very sad for me because I adore her. I’m trying to look on the bright side and remember that I have a new vacation destination with an extra bed, and that Bethany will be shipping me bottles of pineapple wine. But right now I just miss her terribly. Her birthday is in a couple of days so I had a pre-leaving-birthday-dinner for her and served up her favorite craving.
Bethany is the sweetest, most generous person I have ever met. We’ve been friends for eleven years and I cannot imagine my life without her. She is beyond amazing. Kind of like this cupcake. Rich chocolate cake with the perfect texture topped with fluffy salted caramel buttercream and a drizzle of fresh salted caramel sauce. I like to think of the salty kick as the hidden depths of Bethany’s character. You think you know her as this quiet, sweet woman – then you really get to know her and she’s full of spunk, stubbornness (in a good way) and sass.
The caramel sauce is the kicker in this recipe. The salty takes the edge off all that sweet decadence making each bite just perfect. There’s no caramel in the cake, but the method of melting the butter before beating it gives a little hint of nutty flavor to the chocolate. It’s halfway to a browned butter flavor and gives an excellent depth to the cake. But the caramel. Oh, the caramel. It would be fabulous on ice cream, drizzled over your favorite coffee drink or just be like me and gobble it up with a spoon. All by itself. Yup. That’s how I roll.
Print Recipe for Chocolate Salted Caramel Cupcakes
Chocolate Salted Caramel Cupcakes
from The Brown Eyed Baker
½ cup plus 1 tablespoon Dutch-process cocoa powder
½ cup plus 1 tablespoon hot water
2¼ cups all-purpose flour
¾ teaspoon baking soda
¾ teaspoon baking powder
½ teaspoon salt
1 cup plus 1 tablespoon unsalted butter, at room temperature
1 & 2/3 cups granulated sugar
3 eggs
1 tablespoon vanilla extract
¾ cup sour cream
Salted Caramel Frosting
1 cup unsalted butter, at room temperature
8 ounces cream cheese, at room temperature
½ cup salted caramel sauce (recipe below – can be made ahead of time)
4 cups powdered sugar
To Garnish:
Salted Caramel Sauce
Fleur de Sel (or other flaky sea salt)
1. Make the Cupcakes: Preheat oven to 350 degrees F. Line standard-size muffin pans with paper liners.
2. In a small bowl, whisk together the cocoa powder and hot water until smooth. In a separate medium bowl, whisk together the flour, baking soda, baking powder, and salt.
3. Combine the butter and sugar in a medium saucepan set over medium heat. Cook, stirring occasionally, until the mixture is smooth, and the butter is completely melted. Transfer the mixture to the bowl of an electric mixer and beat on medium-low speed until the mixture is cool, about 4 to 5 minutes.
4. Add the eggs one at a time, mixing well after each addition, and scraping down the sides of the bowl as needed. Add the vanilla and then the cocoa mixture, beating until smooth.
5. Reduce the mixer speed to low, and add the flour mixture in three additions, alternating with the sour cream, beginning and ending with the flour mixture. Mix each addition until just incorporated.
6. Divide the batter evenly between the prepared liners, filling each about two-thirds full. Bake until a toothpick inserted in the center comes out clean, 18 to 20 minutes, rotating the pans halfway through baking. Let cool in the pan for 10 minutes, then transfer to a wire rack to cool completely.
7. Make the Frosting: Beat together the butter and cream cheese on medium-high speed for 5 minutes (I like to use the whisk attachment for my KitchenAid stand mixer, but it’s not necessary). Pour in the salted caramel and beat until combined. Reduce the speed to medium-low and slowly add the powdered sugar, a little at a time, until it has all been incorporated. Increase the speed to medium-high and beat for an additional two to three minutes, until light and fluffy.
8. To finish, pipe frosting onto the top of each cupcake (or use an offset spatula to spread the frosting), drizzle with some additional salted caramel sauce, and sprinkle with a pinch of fleur de sel.
Salted Caramel Sauce
Yield: 2 cups of sauce
Prep Time: 5 minutes | Cook Time: 15 minutes
2 cups granulated sugar
12 tablespoons unsalted butter, at room temperature, cut into pieces
1 cup heavy cream, at room temperature
1 tablespoon fleur de sel (or any other flaky sea salt)
1. Add the sugar in an even layer over the bottom of a heavy saucepan, with a capacity of at least 2 or 3 quarts. Heat the sugar over medium-high heat, whisking it as it begins to melt. You’ll see that the sugar will begin to form clumps, but that’s okay. Just keep whisking and as it continues to cook, they will melt back down. Stop whisking once all of the sugar has melted, and swirl the pan occasionally while the sugar cooks.
2. Continue cooking until the sugar has reached a deep amber color. It should look almost a reddish-brown, and have a slight toasted aroma. This is the point where caramel can go from perfect to burnt in a matter of seconds, so keep a close eye. If you are using an instant-read thermometer, cook the sugar until it reaches 350 degrees F.
3. As soon as the caramel reaches 350 degrees, add the butter all at once. Be careful, as the caramel will bubble up when the butter is added. Whisk the butter into the caramel until it is completely melted.
4. Remove the pan from the heat and slowly pour the cream into the caramel. Again, be careful because the mixture will once again bubble up ferociously. Whisk until all of the cream has been incorporated and you have a smooth sauce. Add the fleur de sel and whisk to incorporate.
5. Set the sauce aside to cool for 10 to 15 minutes and then pour into your favorite glass jar and let cool to room temperature. You can refrigerate the sauce for up to 2 weeks. You’ll want to warm the sauce up before using.
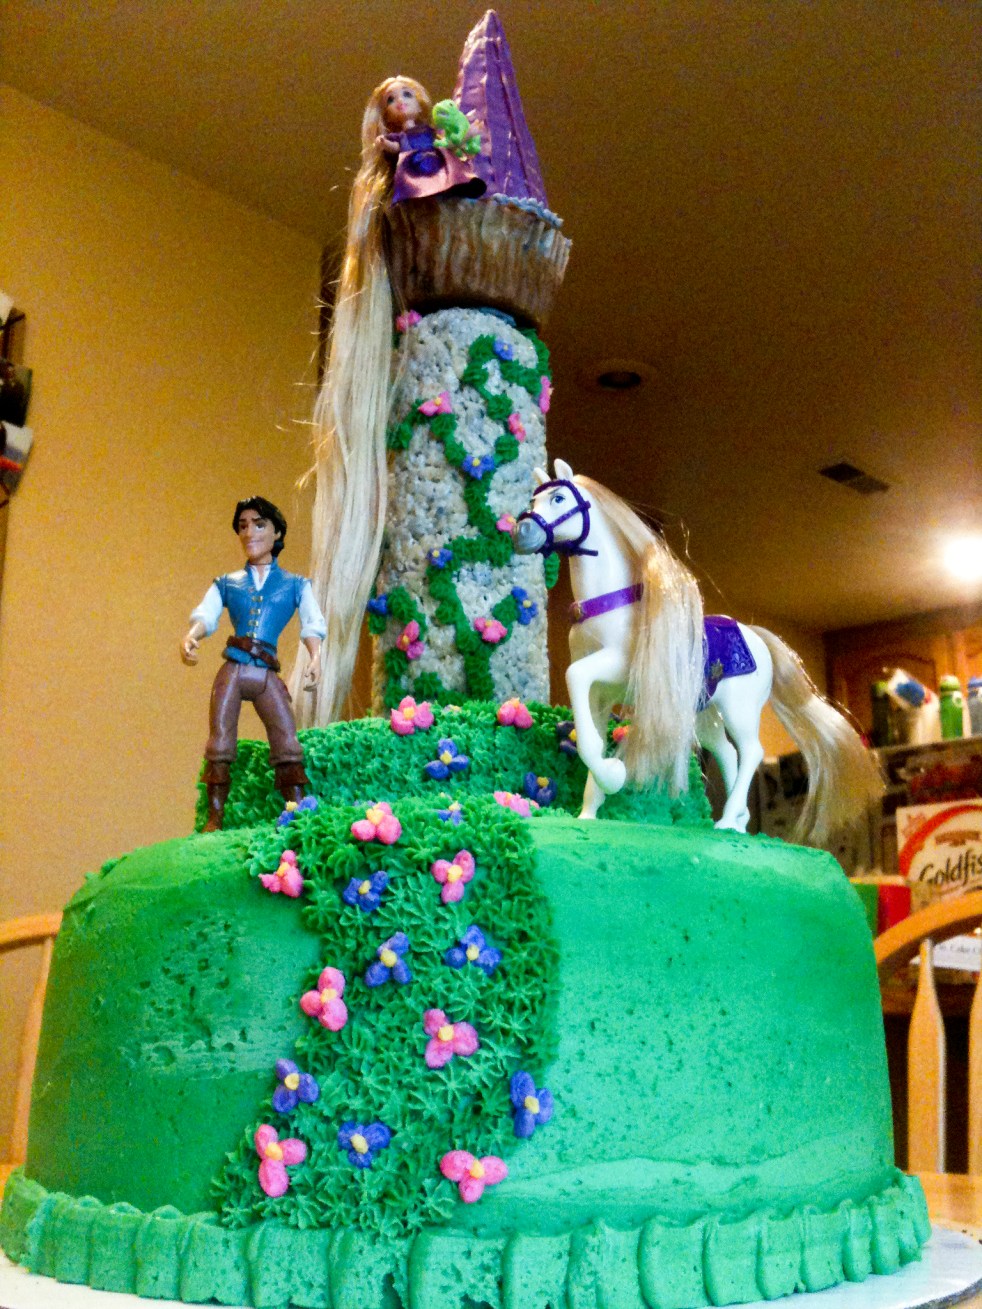
Best Buttercream Ever
For her birthday this year, my sweet daughter wanted a Rapunzel cake. She’s obsessed with the movie Tangled and her 5th birthday party was a reflection of that. I used this buttercream for her cake as well as my sons Cars birthday cake. It is very easy to work with, holds up when piping it on the cake and tastes delicious. [Read more…]